
Before you start
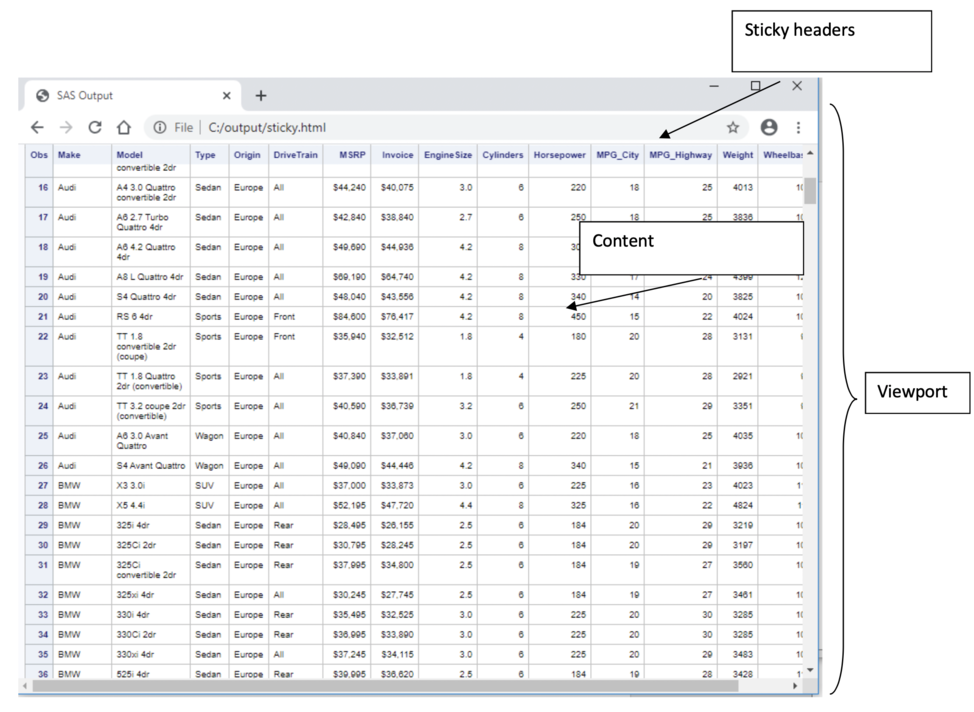
Here is a brief explanation about the task that this blog helps you accomplish. Since the position: sticky style property is supported with the <TH> HTML tags within tables, it is very easy for you to add the position: sticky style for HTML tables that ODS HTML generates. When this CSS style attribute is added for the headers, the headers are fixed within the viewport, which is the viewable area. The content in the viewport is scrollable, as seen in the example output below.
In the past, JavaScript was the main tool for generating fixed headers that are compatible across browsers and devices. However, the position: sticky property has also made it easier to fix various other elements, such as footers, within the viewport on the web page. This blog demonstrates how to make the <TH> tag or header class sticky but enable the rest of the web page to be scrolled. The techniques here work for both desktop and mobile applications. There are multiple ways to add this style. Choose the method that is most convenient for you.
Method 1: Use the HEADTEXT= option
This example uses the position: sticky style property for the header class, which is added to the HEADTEXT= option in the ODS HTML statement. The header class is added along with the position style property between the <HEAD> and </HEAD> tags, which is the header section of the web page. This method is very convenient. However, you are limited to 256 characters and you might want to add other CSS style properties. The position style property is added using the header class name, which is used by ODS HTML to add style attributes to the column headers. As the name suggests, cascading elements cascade and enable elements with like names to be combined. In the following code example, the HEADTEXT= option uses a CSS rule with the header class and the position: sticky property for the header section of the web page.
ods html path="c:\temp" file="sticky.html" headtext="<style> .header {position: sticky;top:0}</style>"; proc print data=sashelp.cars; run; ods html close; |
Here is what the output looks like:

Method 2: Use the STYLESHEET= option
You can also add the position: sticky property to the header class from an external CSS file, which can be referenced in ODS HTML code by using the STYLESHEET= option with the (URL=) suboption. This method uses a CSS file as a basis for the formatting, unlike the first method above, which had applied the default HTMLBLUE style for the destination.
Another item worth mentioning in this second example is the grouping of the CSS class selectors, which match the style element names used with ODS and the TEMPLATE procedure. For example, the body, systemtitle, header, rowheader, and data class selectors are added and grouped into the font-family style property. This method is also used for several of the other style properties below. The data class adds some additional functionality worth discussing, such as the use of a pseudo style selector, which applies a different background color for even alternating rows. In the example below, the class names and the template element names are the same. You should place the CSS style rules that are shown here in a file that is named sticky.css.
.table tbody tr:nth-child(even) td { background-color: #e0e0e0; color: black; } |
.body, .systemtitle, .header, .rowheader, .data { font-family: arial, sans-serif; } .systemtitle, .header, .rowheader { font-weight: bold } .table, .header, .rowheader, .data { border-spacing: 0; border-collapse: collapse; border: 1px solid #606060; } .table tbody tr:nth-child(even) td { background-color: #e0e0e0; color: black; } .header { background-color: #e0e0e0; position: -webkit-sticky; position: sticky; top:0; } .header, .rowheader, .data { padding: 5px 10px; } |
After you create that CSS file, you can use the ODS HTML statement with the STYLESHEET= option. In that option, the (URL=) suboption uses the sticky.css file as the basis for the formatting. Forgetting to add the (URL=) suboption re-creates a CSS file with the current template style that is being used.
ods html path="c:\temp" file="sticky.html" stylesheet=(url="sticky.css"); proc print data=sashelp.cars; run; ods html close; |
Here is what the output looks like:
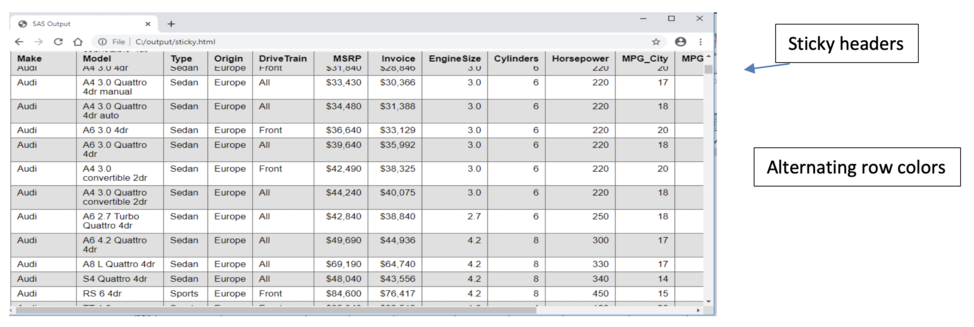
The pseudo class selector in the CSS file indicated that even alternating rows for all <TD> tags would be colored with the background color gray. Also, the position: sticky property in the header class fixed the position of the header within the viewport.
Method 3: Use the TableEditor tagset
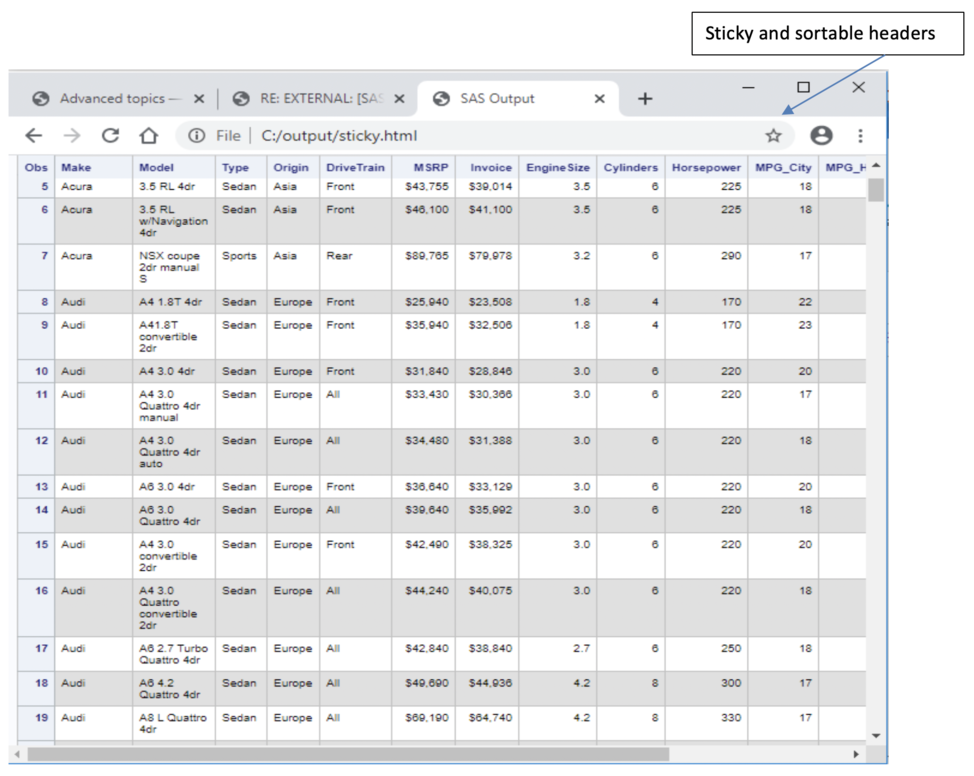
A third method uses the TableEditor tagset, which enables sticky headers to be added by using options. Options are also applied to modify the style for the alternating even and odd rows as well as to have sortable headers.
/* Reference the TableEditor tagset from support.sas.com. */ filename tpl url "http://support.sas.com/rnd/base/ods/odsmarkup/tableeditor/tableeditor.tpl"; /* Insert the tagset into the search path for ODS templates. */ ods path(Prepend) work.templat(update); %include tpl; ods tagsets.tableeditor file="c:\output\temp.html" options(sticky_headers="yes" sort="yes" banner_color_even="#e0e0e0") style=htmlblue; proc print data=sashelp.cars; run; ods tagsets.tableeditor close; |
Here is what the output looks like:
In summary, this article describes how easy it is to add sticky headers to tables that are generated by using the ODS HTML destination. Adding fixed headers to any table allows the output to dynamically preserve the headers in the viewable area while scrolling through the table, allowing a much richer experience. Give it a try and let me know how it goes.

7 Comments
Nicely done Chevell!
This is fabulous, Chevelle! Is there any way to make the first two header rows sticky? I have a table that uses spanned column headers. When I make the headers sticky, it is only showing the second row. Thank you!
Hi Chevell,
This is a great example-driven article, thank you so much. I have been trying to give my users a good excuse use the ODS HTML destination and not just export output to Excel simply to get the frozen headers feature.
Now, having achieved the impossible, are you able to point us in the direction of how we can freeze the Titles of the Proc PRINT as well ?
Having the Titles and the table column headers frozen is going to make for a really useful reporting tool. Is this possible using a tweak to what you have already.
Many thanks,
Downunder Dave
Wellington
Very nice!
Thanks Don!!
Neat feature! - I can think of a lot of places to use this, when showing data tables below my graphs! 🙂
I am glad you like it Robert and also happy to hear you are able to find a place for it along with all of those amazing graphs that you generate!